
I think this is the cutest crochet pumpkin pattern! Get your hook and yarn out and let’s hook up these adorable pumpkins! Autumn is my favorite time of the year. Every Autumn I like to decorate with pumpkins. I want to share this free pattern with you, so you can decorate and welcome in Autumn.

Enter to win a mystery box of supplies!
What you will need:
Yarn (depending on the yarn and hook you use, will determine the size of your pumpkin)
Crochet hook
yarn (I used Schachenmayr Catania yarn)
embroidery needle
floral wire
scissors
fiber fill
wirecutters
In need of supplies? Shop Arts and Crafts
Stitches
sc – single crochet
sl st – slip stitch
st – stitch (es)
ch – chain
picot – chain 3, sl st in st below
esc – extended single crochet esc – insert hook into stitch, yo and pull through (2 loops on hook) yo and pull through first loop on hook, (2 loops on hook) yo and pull through both loops on hook.
Pumpkin
ch 16
Row 1: sc in 2nd ch from hook, sc in next 2 chs, esc in next 9 chs, 3 sc in last 3 chs. ch1 turn (15 sts)
Row 2: sc in next 5 sts, esc in next 5 sts, sc in last 5 sts. ch1 turn (15 sts)
Row 3: sc in next 3 sts, esc in next 9 sts, sc in last 3 sts. ch1 turn (15 sts)
Rows 4-25: repeat row 1 and 2 eleven times.
Row 26: row 2 one time (15 sts)
do not fasten off
Crochet book and supplies:


Fold material in half and slip stitch together,


fasten off with a long strand of yarn long enough to stitch both ends of the pumpkin. Turn tube inside out.
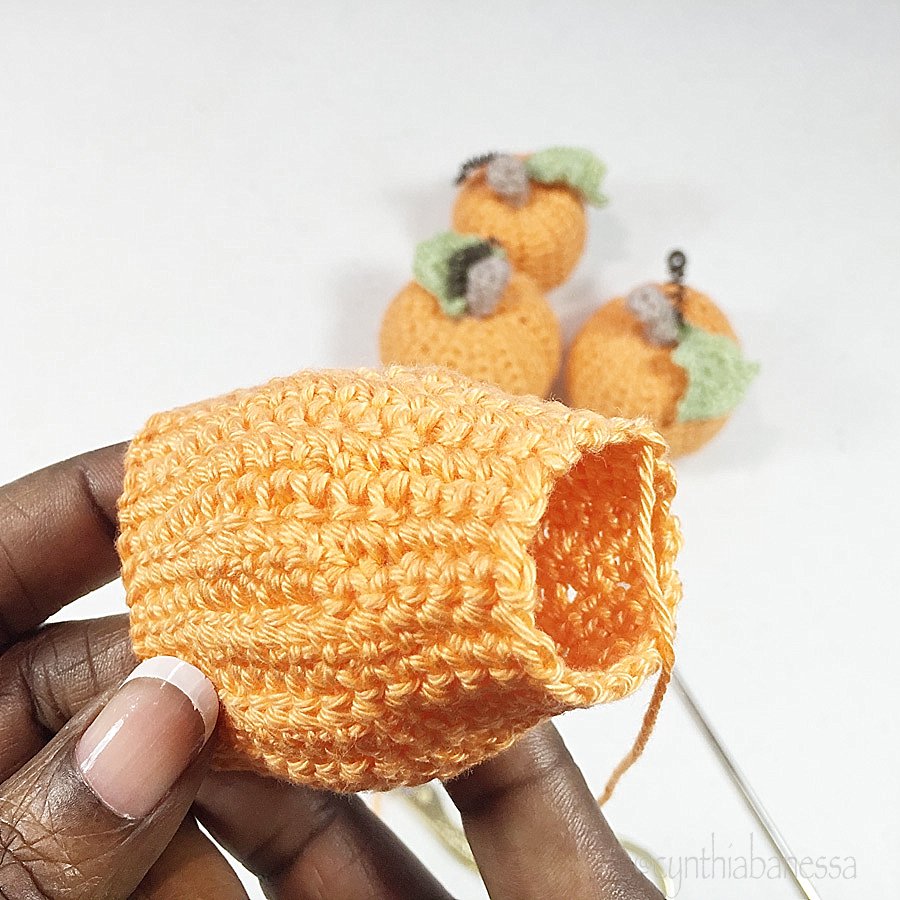
Stitch around one end and draw it together,

stuff the pumpkin with polyfill,

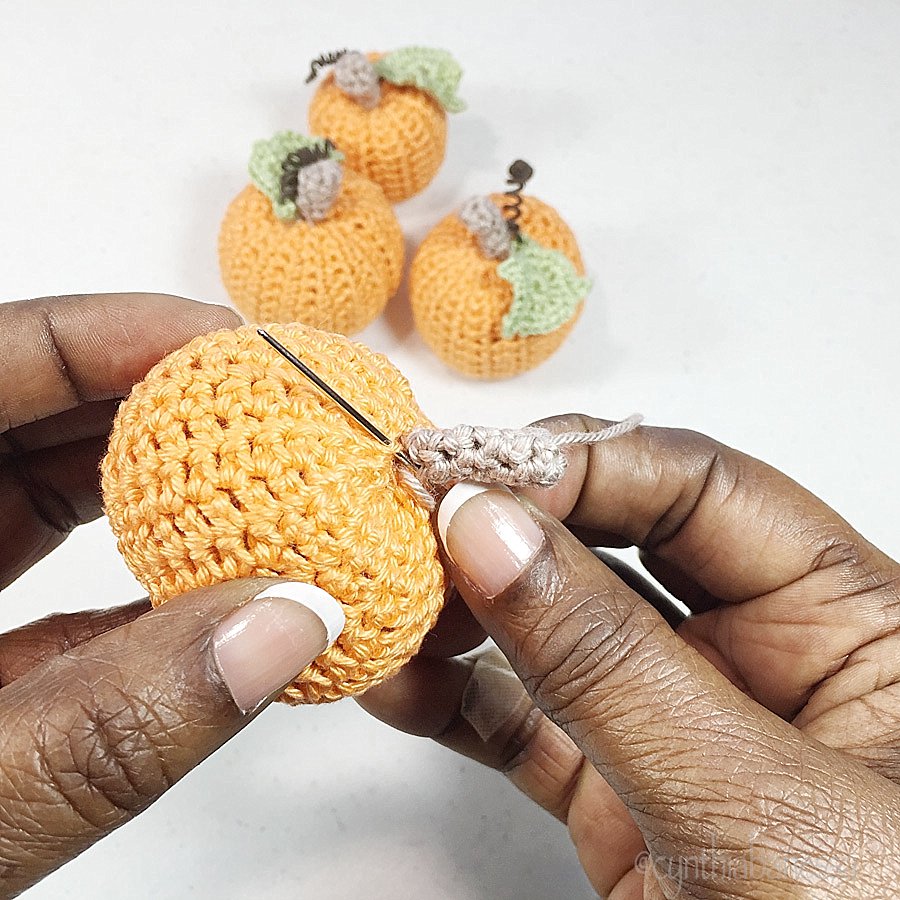
next insert the needle up through the middle of the pumpkin and stitch around the top of the pumpkin and pull taunt,


fasten off. (set pumpkin aside)


Pumpkin stalk
Magic ring, ch 1
Rnd1: 5 sc in magic ring (5 sts)
Rnd 2-5: sc in each st,
fasten off with yarn long enough to attach stalk to top of pumpkin
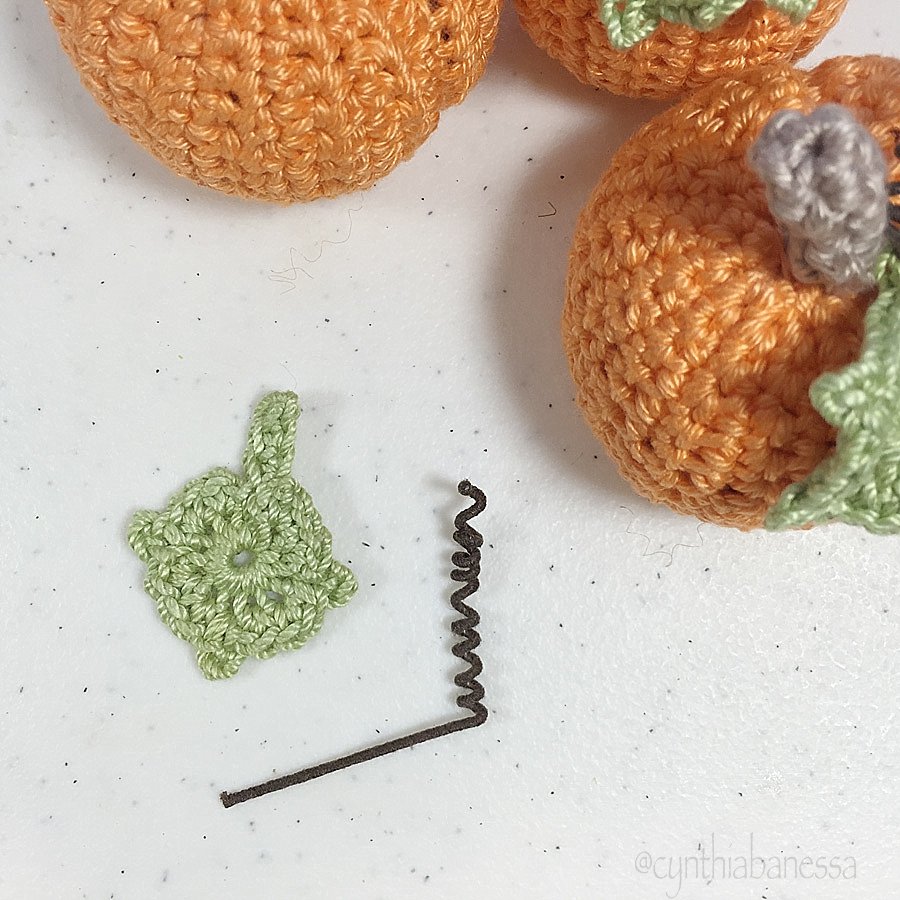
Leaf and Tendril
Tendril: To make the tendril, using your wire cutters, cut about 5-7 inches of the floral wire and take your embroidery needle and wrap the wire around, leaving a straight edge long enough to insert in stem of leaf and to insert next to the stalk of the pumpkin.

Leaf: Magic ring, ch1
Rnd 1: 12 sc in magic ring, sl st in first sc (12 sts)
Rnd 2: ch 4, sc in 2nd chain from hook, sc in next 2 chs, sl st in same st, *2 sc in next two sts, picot in next st,* 2 more times, 2 sc in next two sts, slip stitch in first chain of stalk, fasten off. Sew in loose yarn.

Enter to win a mystery box of supplies!
Disclosure: This page may contain affiliate links which help me cover the cost of publishing my blog. Should you choose to make a purchase, at no additional cost to you, I will be given a small percentage of the sale.
Latest posts by Cynthia (see all)
- Embroidered Canvas Purse - January 31, 2018


This IS really cute!
Thank you for sharing and showing such clear pictures.
If I can find some orange yarn in my pile, I’m going to have a try on these ones 🙂
Have a nice day, Sigrid
Thank you Sigrid! 😃
these are just adorable. I am not a crocheter, but if I was, I know I would be making a bunch of these cute little pumpkins! I have pinned these and I am sharing over at FB and Twitter! I would love it if you would stop by and share them over at Celebrate it Sunday! Happy Fall!
Chloe Crabtree recently posted…Should You Invite Birds to the Table?
Thank you! I would love to share them, thanks for the invitation!
These truly are the cutest little pumpkins! Thank you so much for coming by and sharing at Celebrate it Sunday! I hope you will come by and party with us again this week!
Chloe Crabtree recently posted…The Birds Have Invaded for Halloween!
Thank you so much for the invite!!!
These little pumpkins are so cute! I love the vertical method you used as well. Can’t wait to make a few of these!
Hi Bethany! I wasn’t ignoring you, so happen your comment was in spam…”unusual” Hope you had a chance to try out the pumpkins!
Hellop
I am planning on making these for a silent auction item for my woman’s club Game Day. Would like to make them in three sizes. Any tips on how to accurately increase the size? Thanks, these are adorable!
Hi Jill, Wonderful that you are doing a silent auction…Sorry, I don’t have a pattern for resizing.
Just love these, I’m going to make some today.
Thank you for sharing the pattern
Carolyn
Thank you Carolyn, for the visit! Enjoy!!! 😃
I am loving this pattern, and I have found it just in time for the Autumn/Harvest season <3 Just one quick question, for Row 4, am I crocheting row 2, with the 5/5/5 stitch sequence, or am I repeating the 3/9/3 sequence from the row prior (row 3). I hope this makes sense. Thank you
Thank you, Jaclyn! So glad you love it!
Hi Cynthia,
(Great name 🙂 )This is exactly what I was looking for to compliment my Cinderella amigurumi that I made. Thank you for posting!
Thank you, Cyndi! I’m so glad that this pattern was useful!
Thank you for sharing!
What size hook did you use and what size hooks would you recommend to make it bigger?
Thanks for the pattern! For Rows 4-25, should rows 2 & 3 be repeated eleven times or is rows 1 & 2 correct?
Cynthia these little pumpkins are adorable! I’m new at crocheting and have made only blankets so far. I’m going to give these a shot. Thanks for sharing & pictures. They are very helpful. Have a blessed day.
Thank you for sharing your work. . . its easy and more importantly your instructions and pictures were super clear! I was searching the internet for an easy pumpkin pattern!!! I will keep this pattern forever.
Adorable! And your instructions with pictures are great. Thank you!
Thank you so much, Bev! Have fun making them!
Hi Cynthia,
I just love this pumpkin pattern that I’m even working on one now. I’m working on the leaf and my leaf came out different than the picture. I’m learning as I go – what does the ‘*’ (asterisk) mean?
Thank you
Barbra